🌳 Air Layering Propagation Method of Guava Plant: A Comprehensive Guide
Guava (Psidium guajava) is a tropical fruit-bearing plant cherished for its delicious taste, high nutritional value, and medicinal properties 🍏. While it can be easily propagated by seeds, doing so often results in delayed fruiting and variable fruit quality. Vegetative propagation offers better alternatives, and among them, air layering stands out as the most successful and reliable technique. This article covers a step-by-step guide to air layering, supported by explanations, diagrams, and essential dos and don’ts to help you achieve a high success rate ✅.
🌿 Why Air Layering is the Best Method for Propagating Guava
- Seed propagation leads to delayed fruiting (up to 4-5 years) ⏳ and inconsistency in fruit size, taste, and quality.
- Stem cuttings have a low success rate due to poor rooting ❌.
- Air layering has a success rate of over 90% 🚀, ensures true-to-type plants, and promotes early fruiting (within 1-2 years).
📖 Step-by-Step Guide to Air Layering Guava Plant
✅ Step 1: Select the Right Branch
- Choose a healthy, disease-free guava plant 🌱.
- The selected branch should be:
- Semi-hardwood (neither too young nor too old)
- Around 1 cm in diameter
- Free from pests and diseases
✨ Tip: Best time to do air layering is during the monsoon season (July to September) ☔ when humidity is high and root development is faster.
Diagram 1: Ideal Guava Branch for Air Layering
✅ Step 2: Girdling (Removing a Ring of Bark)
- Using a sharp, sterile knife, remove a 1-inch ring of bark from the selected stem ✂.
- Make two circular cuts around the branch about 1 inch apart and connect them with a vertical cut.
- Peel off the bark and scrape the green cambium layer lightly to prevent the bark from regrowing ✍️.
⚠️ Caution: Don’t cut too deep to damage the wood inside.
Diagram 2: Bark Removal and Cambium Scraping
✅ Step 3: Preparing the Rooting Medium
Prepare any one of the following:
- Garden soil + Vermicompost (1:1) ⛏
- Moist sphagnum moss
Optionally, mix a pinch of rooting hormone (like IBA powder) into the mixture to enhance root formation ⚗️.
ℹ️ Note: Make sure the medium is moist but not soaking wet.
Diagram 3: Rooting Medium Preparation
✅ Step 4: Applying the Rooting Medium
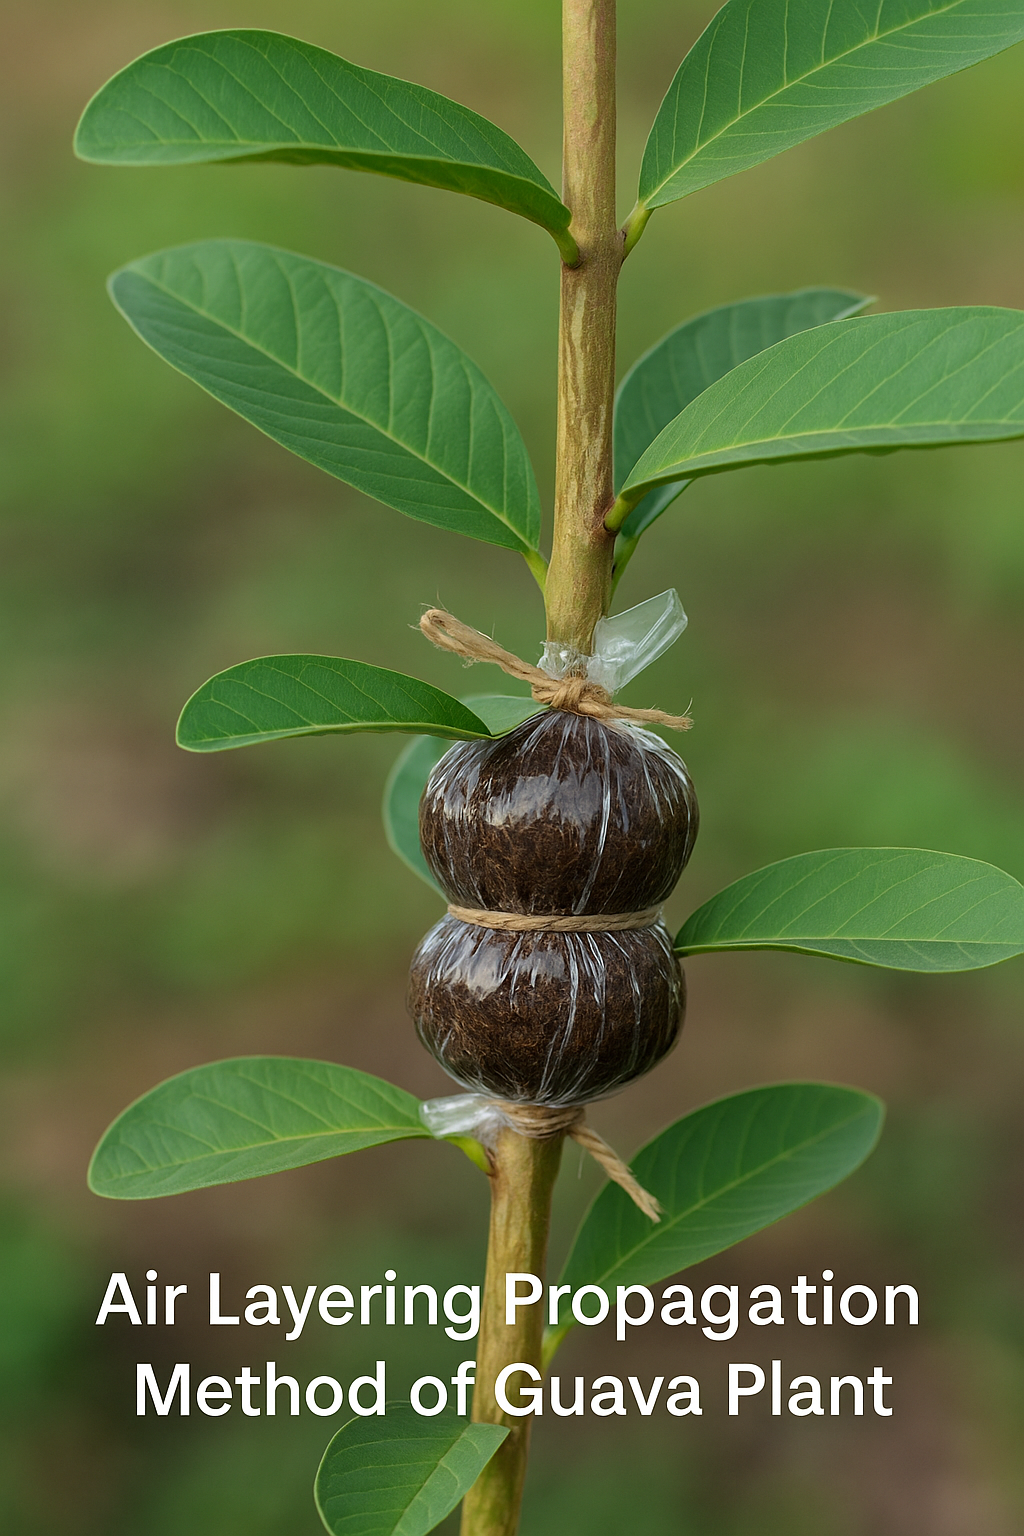
- Take a generous amount of the rooting mix and wrap it around the girdled section.
- Form a thick layer (approx. 2-3 cm thick) around the stem 🔄.
Diagram 4: Wrapping Rooting Medium Around Stem
✅ Step 5: Wrapping with Plastic Sheet
- Use a transparent plastic sheet (e.g., polythene) to wrap the rooting medium securely 🛋️.
- Tie tightly with strings at both ends to prevent air and water from entering.
- Label the layered branch with the date for easy tracking ⏰.
📅 Optional: Cover with aluminum foil to reduce sunlight exposure and prevent overheating.
Diagram 5: Plastic Wrapping Technique
✅ Step 6: Root Formation and Monitoring
- Within 3 to 5 weeks, roots begin to form and will be visible through the transparent plastic 🪴.
- If you observe white or light brown roots, it’s time to proceed to the next step 🌳.
❎ Do not remove or disturb the wrap frequently.
✅ Step 7: Separating the Layered Branch
- Cut the rooted branch 1-2 cm below the root zone using sterilized pruners 🧦.
- Gently remove the plastic without disturbing the root ball.
✅ Step 8: Transplanting the New Plant
- Prepare a pot with a growing mix of:
- 70% garden soil
- 30% well-decomposed compost or cow dung manure 🪴
- Plant the new sapling and water immediately 💧.
- Place it in a semi-shaded area for 7-10 days to help it adjust 🌊.
✅ Step 9: Shifting to Full Sunlight
- After the plant stabilizes and shows new leaf growth, move it to a sunny location ☀️.
- Continue regular watering and begin light fertilization after 3 weeks.
❄️ Dos and Don’ts of Air Layering Guava
✅ Do’s
- Use sharp, sterile tools to prevent infections 🔧
- Perform air layering during humid seasons for faster rooting ☔
- Keep the rooting medium consistently moist 💧
- Label the branch with the date of layering 🔹
- Monitor root development weekly without disturbing the wrapping ✅
❌ Don’ts
- Don’t layer on a branch that’s too young or too woody 🚫
- Don’t let the rooting medium dry out ❌
- Don’t apply excessive rooting hormone ⚠️
- Don’t expose the layered portion to direct sunlight 🔍
- Don’t overwater the new plant after transplanting 🚫
📃 Frequently Asked Questions (FAQ)
Q1: When is the best time to do air layering for guava?
A: Monsoon season (July to September) is ideal due to high humidity levels ☔.
Q2: Can I use only compost as rooting medium?
A: No, use compost mixed with garden soil or sphagnum moss for best results 📋.
Q3: What should I do if roots are not visible even after one month?
A: Wait another 1-2 weeks; ensure moisture is adequate and the wrapping is tight ⏳.
Q4: Can air layering be done on any branch?
A: No, only choose semi-hardwood, pencil-thick, disease-free branches ✅.
Q5: Do I need to fertilize the plant immediately after transplanting?
A: No. Wait at least 3 weeks before applying diluted organic fertilizer ⚗️.
🌿 Conclusion
Air layering is a highly successful, cost-effective, and simple technique for propagating guava plants. By following the above step-by-step guide, even beginners can clone high-quality guava trees that bear fruit quickly and consistently 🍏. With proper care and attention to detail, you can multiply your guava plants easily and enjoy a bountiful harvest 🌿.
Start your air layering project today and grow your guava garden with confidence! 🌱


Leave a Reply